How to easily resize videos for instagram a step by step guide – How to easily resize videos for Instagram: a step-by-step guide – sounds boring, right? Wrong! Getting your videos Insta-ready is way easier than you think, and mastering this skill unlocks a world of likes and engagement. We’re diving deep into the nitty-gritty of video dimensions, exploring the best tools, and guiding you through the process with crystal-clear instructions. Prepare to become a video-resizing ninja!
From understanding Instagram’s picky video size requirements (yes, they’re picky!) to choosing the perfect resizing tool and troubleshooting those pesky blurry videos, this guide has you covered. We’ll walk you through each step, complete with screenshots and helpful tips, so you can finally upload stunning videos that don’t look like they were filmed on a potato. Get ready to elevate your Instagram game!
Instagram Video Dimensions: A Quick Guide
So, you’ve got killer video content ready to go, but before you hit that upload button, there’s a crucial step: understanding Instagram’s video size recommendations. Ignoring these can lead to a less-than-stellar viewing experience for your audience, and frankly, nobody wants that. Getting the dimensions right ensures your videos look sharp, load quickly, and ultimately, get more engagement.
Knowing the right dimensions is essential for a smooth Instagram experience. Uploading videos with incorrect dimensions can result in several issues. Your video might be cropped awkwardly, leaving out important parts of the action or text. It could be stretched and distorted, looking blurry and unprofessional. Or, in the worst-case scenario, Instagram might refuse to upload it altogether.
Instagram’s Recommended Video Sizes
Optimizing video size is key to a better user experience. Smaller file sizes lead to faster loading times, meaning your viewers won’t have to wait ages for your content to play. This is particularly important in today’s fast-paced world where attention spans are shorter than ever. Faster loading also reduces the chance of viewers abandoning your video before it even starts, thus improving engagement and reach. Consider the difference between a video that loads instantly and one that takes 10-15 seconds to buffer – the former is much more likely to keep viewers hooked.
| Aspect Ratio | Recommended Dimensions (pixels) |
|---|---|
| 9:16 (Vertical) | 1080 x 1920 |
| 4:5 (Square-ish) | 1080 x 1350 |
| 1:1 (Square) | 1080 x 1080 |
Choosing the Right Video Resizing Tool
Source: wondershare.com
So, you’ve got your awesome video, ready to slay the Instagram game. But before you hit that upload button, remember the golden rule: size matters! Choosing the right video resizing tool can be the difference between a viral sensation and a blurry mess. Let’s dive into the options and find your perfect match.
Picking the ideal video resizer depends on your specific needs. Are you a seasoned pro with complex editing requirements, or a casual user just looking for a quick and easy fix? Factors like your technical skills, budget, and the frequency of video editing will all influence your choice. Consider the features offered, ease of use, platform compatibility, and whether you prefer a free or paid option. Let’s explore some popular choices.
Video Resizing Tool Comparison
To help you navigate the world of video resizing software, we’ve compared three popular options: Kapwing, Canva, and Adobe Premiere Pro. Each has its strengths and weaknesses, making the choice dependent on your individual needs and preferences. The following table highlights key features, ease of use, and pricing.
| Feature | Kapwing | Canva | Adobe Premiere Pro |
|---|---|---|---|
| Ease of Use | Very Easy; Intuitive interface, suitable for beginners. | Easy; User-friendly drag-and-drop interface, suitable for beginners and intermediate users. | Intermediate to Advanced; Steep learning curve, requires prior video editing experience. |
| Features | Basic resizing, some basic editing tools. | Resizing, basic editing, text overlays, filters, and templates. | Extensive editing capabilities, including advanced resizing, color correction, effects, and more. |
| Pricing | Free plan with limitations; paid plans for advanced features and removal of watermarks. | Free plan with limitations; paid plans for access to premium features and assets. | Subscription-based; relatively expensive, but offers the most comprehensive features. |
| Platform Compatibility | Web-based; accessible from any device with a browser. | Web-based and mobile apps; accessible from various devices. | Desktop software; available for Windows and macOS. |
Choosing a Video Editing Software: A Flowchart
The decision-making process for selecting the right video editing software can be simplified using a flowchart. This visual guide helps you navigate the choices based on your technical skills and needs.
Imagine a flowchart starting with a central question: “What is your level of technical expertise?”. Two branches emerge: “Beginner” and “Experienced”. The “Beginner” branch leads to a question: “Do you need extensive features?”. A “No” answer points to Kapwing or Canva, while a “Yes” answer might lead to a reconsideration of skill level or exploration of simpler, feature-rich options. The “Experienced” branch leads directly to Adobe Premiere Pro, or other professional-grade software. Each path should clearly indicate the suggested software and a brief rationale. This visual representation makes the selection process more straightforward.
Factors to Consider When Choosing a Video Resizing Tool
Several key factors should guide your decision when selecting a video resizing tool. Weighing these elements ensures you choose a tool that aligns perfectly with your needs and technical capabilities.
Free vs. Paid: Free tools offer a convenient entry point, but often come with limitations like watermarks or restricted features. Paid options typically provide more advanced features and better support. Consider your budget and the frequency of your video editing needs. A free tool might suffice for occasional use, while a paid subscription is beneficial for regular editing. For example, a small business owner posting weekly Instagram videos might justify a paid subscription for Canva, whereas a casual user sharing occasional clips might find Kapwing’s free plan adequate.
Ease of Use: User-friendliness is crucial, especially for beginners. Intuitive interfaces and simple workflows can save you time and frustration. Tools like Kapwing and Canva prioritize ease of use, making them ideal for those new to video editing. In contrast, Adobe Premiere Pro’s powerful features come with a steeper learning curve.
Features: Consider the specific features you need. Do you only require resizing, or do you also need basic editing capabilities like trimming, adding text, or applying filters? Matching your requirements with the tool’s features is essential for efficient workflow.
Platform Compatibility: Ensure the tool is compatible with your operating system and devices. Web-based options like Kapwing and Canva offer broader accessibility compared to desktop-only software like Adobe Premiere Pro.
Step-by-Step Guide to Resizing Videos Using Kapwing: How To Easily Resize Videos For Instagram A Step By Step Guide
Resizing videos for Instagram can feel like navigating a maze, but with the right tool, it’s a breeze. Kapwing, a free online video editor, offers a user-friendly interface perfect for even the most novice video editors. This guide will walk you through the process, ensuring your Instagram videos are perfectly sized and ready to shine. We’ll focus on the essential steps, minimizing the fuss and maximizing your results.
Importing Your Video into Kapwing
To begin your Instagram video resizing journey, you’ll first need to import your video file into Kapwing. After navigating to the Kapwing website, you’ll see a prominent “Start Editing” button. Clicking this will open the Kapwing editor. From there, you can either drag and drop your video file directly into the workspace or click the “Upload” button to select your video from your computer’s file explorer. The interface is intuitive, with a clean layout that guides you through each step. Imagine a blank canvas, ready for your video masterpiece. Once uploaded, your video will appear in the editor’s timeline, ready for resizing. A screenshot would show a clean, modern interface with a large central area for video placement and clear buttons for uploading and editing functions. The upload progress bar would be clearly visible, indicating the file is being processed.
Adjusting Video Dimensions for Instagram
Now comes the crucial step: resizing your video to Instagram’s specifications. Kapwing offers a simple, yet powerful, resizing tool. You’ll locate a section (usually within the “Export” or “Settings” menu) that allows you to specify the desired dimensions. For Instagram, you’ll want to select the appropriate aspect ratio, whether it’s 9:16 for vertical videos, 1:1 for square videos, or 16:9 for horizontal videos. Inputting the precise pixel dimensions (e.g., 1080 x 1920 for a vertical video) ensures a perfect fit. A screenshot of this stage would display the settings menu with clearly labeled fields for width and height, alongside a dropdown menu for aspect ratio selection. You’ll see your video within the workspace, showing a preview of the resized dimensions in real-time. Remember to check Instagram’s official guidelines for the most up-to-date dimension recommendations.
Exporting Your Resized Video
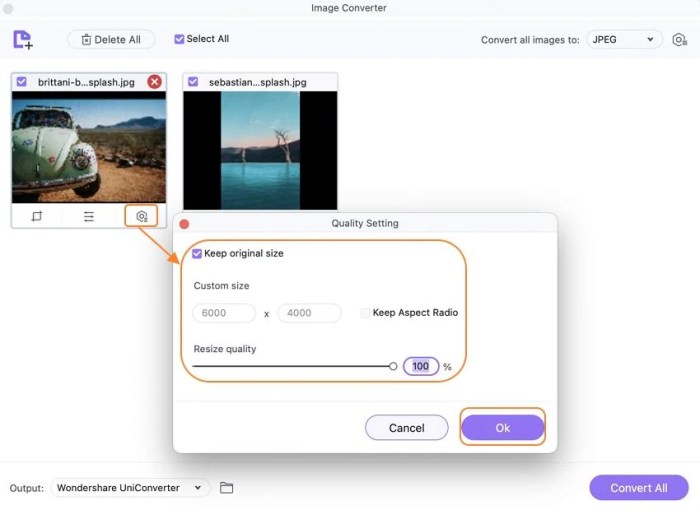
Once you’ve adjusted the dimensions to your liking, it’s time to export your resized video. Kapwing provides various export options, allowing you to choose the desired video quality and resolution. Higher resolutions generally mean better quality but larger file sizes. Finding the balance between quality and file size is key. You’ll find an “Export” button, usually prominently displayed. Clicking it will initiate the export process. A progress bar will typically show the export progress. A screenshot here would showcase the export settings menu, with options for video quality (e.g., 720p, 1080p), file format (e.g., MP4), and a progress bar indicating the export is underway. Once the export is complete, you’ll be able to download your perfectly sized Instagram video.
Tips for Maintaining Video Quality
To preserve your video’s quality during resizing, start with a high-resolution source video. The higher the resolution of your original video, the better the quality will be after resizing. Avoid excessive compression during the export process. While higher compression leads to smaller file sizes, it can negatively impact video quality. Kapwing often allows you to choose a balance between file size and quality. Experiment to find the sweet spot that works for you. Finally, remember to always review your exported video to ensure you are satisfied with the quality before posting it to Instagram.
Step-by-Step Guide to Resizing Videos Using Adobe Premiere Pro

Source: socialmediaexaminer.com
Adobe Premiere Pro, a professional video editing software, offers robust tools for resizing videos, making it ideal for preparing content for various platforms, including Instagram. While it’s a more advanced tool than some others, the control and precision it offers are unmatched for achieving high-quality results. This guide will walk you through the process.
Resizing a Video Using Premiere Pro’s Sequence Settings, How to easily resize videos for instagram a step by step guide
Before you begin, import your video into Premiere Pro. The initial resizing happens when you create your sequence. This sets the canvas size for your project. A correctly sized sequence ensures your video fits Instagram’s requirements without unnecessary cropping or letterboxing.
- Creating a New Sequence: After importing your video, navigate to “File” > “New” > “Sequence.” A dialog box appears. You’ll see various preset options; choose “Instagram 1080p” or create a custom sequence based on Instagram’s recommended dimensions (1080 x 1920 pixels for vertical videos, 1920 x 1080 for horizontal videos). The image would show the “New Sequence” dialog box with various preset options highlighted, including the “Instagram 1080p” preset. Notice the fields for setting custom width and height.
- Importing the Video: Drag your video file from the Project panel into the Timeline panel. The image here shows the project panel on the left with the video file highlighted, and the timeline panel on the right, ready to receive the dragged video. The video will automatically adjust to the sequence’s dimensions.
- Adjusting Aspect Ratio: If you need to change the aspect ratio after creating the sequence, you can do so. While this isn’t ideal for final output, it can be useful for previewing different formats. The image depicts the timeline with the video clip, and the tools used to modify the video scale. This will likely show some distortion if you’re not using a compatible aspect ratio.
Customizing Output Settings
Once your video is resized within the sequence, you need to export it with the correct settings for optimal quality on Instagram.
- Exporting Your Video: Go to “File” > “Export” > “Media.” The export settings dialog box appears, offering various options. The image shows the “Export Settings” dialog box, with focus on the “Format” (likely H.264), “Video” (bitrate, resolution, frame rate) and “Audio” settings. These settings are crucial for maintaining video quality while keeping the file size manageable for Instagram.
- Resolution Settings: Choose a resolution that matches your sequence settings (e.g., 1080 x 1920 pixels). Higher resolutions mean better quality but larger file sizes. The image focuses on the “Video” tab of the export settings, highlighting the resolution field and its numerical value.
- Bitrate Settings: The bitrate determines the data rate of your video. A higher bitrate generally leads to better quality, but again, increases file size. A good starting point is around 8-12 Mbps. The image highlights the bitrate field in the “Video” tab, showing the numerical value and units (Mbps).
- Frame Rate Settings: Maintain the original frame rate of your video unless you have a specific reason to change it. Instagram generally supports standard frame rates (24, 25, 30 fps). The image highlights the frame rate field, showcasing the options available and the selected frame rate.
Step-by-Step Guide to Resizing Videos Using Clipchamp
Clipchamp, a user-friendly online video editor, offers a straightforward way to resize your videos for Instagram. It’s accessible through your web browser and boasts a clean interface, making it perfect for beginners and those seeking a quick resizing solution. No complicated software downloads are needed; you can work directly from your browser.
Video Resizing Process in Clipchamp
Let’s walk through resizing a video using Clipchamp. The process involves uploading your video, selecting the desired aspect ratio, and exporting the resized file. Remember to choose the right aspect ratio for optimal Instagram viewing.
- Upload Your Video: First, navigate to the Clipchamp website and create a free account (if you don’t already have one). Click the “Create a new project” button. You’ll then see a screen prompting you to upload a video from your computer. A window will appear allowing you to browse your files and select the video you want to resize. The upload speed will depend on your internet connection and the video’s size. Once uploaded, the video will appear in the Clipchamp editor. Imagine the screen showing a simple, intuitive interface with your video file prominently displayed in the central workspace.
- Choose the Correct Aspect Ratio: Now, locate the aspect ratio settings. This usually involves selecting a preset size, often found under a menu labeled “Export” or “Settings.” Clipchamp offers several pre-set aspect ratios, including the Instagram-recommended 9:16 (vertical) or 1:1 (square) format. Selecting 9:16 will ensure your video fills the screen on mobile devices, while 1:1 is suitable for square posts. The screen will visually represent the aspect ratio options, possibly with thumbnails demonstrating how the video will appear in each ratio. Consider the visual representation of a dropdown menu displaying the various aspect ratios like 9:16, 1:1, 4:5 etc.
- Export and Download: Once you’ve selected your desired aspect ratio, proceed to the export settings. You might have options to choose video quality (resolution). Higher resolution means a better-looking video but a larger file size. After confirming your settings, click “Export.” Clipchamp will then process your video and prepare it for download. A progress bar will likely appear, indicating the export’s progress. Once complete, a download button will become available. Click this to save the resized video to your device. This process involves a simple “Download” button, possibly with a visual indicator of the file size and format.
Tips for Maintaining Video Quality
To prevent significant quality loss during resizing, try these tips. Higher resolution source videos will yield better results. Avoid excessive scaling; if your original video is too small, the results will be blurry no matter the tool.
- Start with a high-resolution video file. The better the source, the better the resized output will be.
- Choose a suitable export quality setting; while higher quality is preferable, it increases file size.
- Avoid repeatedly resizing the same video, as each resizing step can introduce minor quality degradation.
Downloading the Resized Video
After the export is complete, Clipchamp will usually present a download button. Clicking this button will initiate the download of your resized video to your device. The location of the downloaded file will depend on your browser’s default download settings. It’s advisable to check your downloads folder to locate the file. The downloaded file will typically be in MP4 format, a widely compatible video format suitable for Instagram.
Troubleshooting Common Resizing Issues
Source: launchberg.com
So, you’ve followed our guide on resizing videos for Instagram, but something’s not quite right? Don’t worry, it happens to the best of us! Video resizing can be tricky, and a few common problems often pop up. Let’s dive into the most frequent issues and how to fix them.
Resizing videos for Instagram can sometimes lead to unexpected results. Understanding the root causes of these issues is key to producing high-quality content. We’ll cover blurry videos, distorted aspect ratios, and large file size problems, offering practical solutions for each.
Blurry Videos After Resizing
A blurry video after resizing usually stems from scaling the video up to a larger resolution than the original. Think of it like enlarging a photo – the more you zoom in, the more pixelated it becomes. Instagram prefers higher resolutions, but upscaling a low-resolution video will inevitably result in a blurry mess.
- Start with a high-resolution video: The best solution is prevention. Film your videos in the highest resolution your device allows. This provides more pixels to work with, minimizing blurriness during resizing.
- Use a high-quality resizing tool: Not all resizing tools are created equal. Some tools employ better algorithms for upscaling, resulting in sharper images. Experiment with different tools to find one that best preserves your video quality.
- Avoid excessive scaling: If you must resize, try to minimize the scaling factor. Resizing a video from 720p to 1080p is less likely to cause significant blur than resizing from 360p to 1080p.
Distorted Aspect Ratios
Instagram supports several aspect ratios, but if you don’t resize correctly, your video might appear squished or stretched. This happens when the aspect ratio of your original video doesn’t match the desired Instagram aspect ratio (e.g., trying to fit a 16:9 video into a 9:16 Instagram story).
- Choose the correct aspect ratio from the start: Before filming, decide on the aspect ratio you want to use for Instagram (e.g., 1:1 for feed posts, 9:16 for Reels and Stories). This prevents unnecessary cropping and distortion.
- Use the “letterbox” or “pillarbox” effect: If you need to adapt a video with a different aspect ratio, add black bars (letterboxing for wider videos, pillarboxing for taller videos) to maintain the original aspect ratio while fitting within Instagram’s dimensions. Most video editing software offers this functionality.
- Use intelligent cropping tools: Some editing software allows intelligent cropping, automatically selecting the most visually appealing portion of the video to fit the desired aspect ratio while minimizing image distortion.
Large File Size Issues
Large file sizes can lead to slow upload times and even upload failures. Instagram has limits on video file sizes, so optimizing your videos is crucial.
- Compress your video: After resizing, use a video compression tool to reduce the file size without significantly impacting quality. Many free and paid options are available.
- Reduce video length: Shorter videos naturally have smaller file sizes. Consider trimming unnecessary parts of your video.
- Reduce video bitrate: The bitrate determines the amount of data used per second of video. Lowering the bitrate reduces file size, but may slightly reduce video quality. Experiment to find the optimal balance.
Frequently Asked Questions
Resizing videos for Instagram often raises questions. Here are answers to some common queries:
- What are the best video dimensions for Instagram? Instagram supports various aspect ratios, depending on the type of post. For feed posts, 1:1 is ideal; for Reels and Stories, 9:16 is the standard. Always check Instagram’s current guidelines for the most up-to-date recommendations.
- Can I resize videos on my phone? Yes, several mobile apps offer video resizing capabilities. Many are free and easy to use, providing a convenient alternative to desktop software.
- What happens if I upload a video with the wrong dimensions? Instagram will likely still accept the video, but it might be cropped, stretched, or have black bars added, affecting the visual appeal.
- How can I avoid losing video quality when resizing? Start with high-resolution footage, use a quality resizing tool, and avoid excessive scaling. Consider using compression tools to reduce file size without sacrificing too much quality.
Best Practices for Instagram Video Optimization
Beyond simply resizing your videos for Instagram, optimizing them for the platform is key to maximizing reach and engagement. Think of it like this: resizing is just the first step; true optimization is about making your video shine and stand out amongst the millions of others vying for attention. This involves a multi-faceted approach focusing on quality, engagement, and understanding Instagram’s algorithm.
High-quality source material and strategic editing are fundamental to a successful Instagram video. Poorly lit, blurry, or poorly-edited videos will quickly lose viewers, regardless of the content. Using a good camera and investing time in post-production can significantly improve your video’s impact. Consider the lighting, audio quality, and overall visual appeal. A well-produced video conveys professionalism and care, subconsciously influencing how viewers perceive your brand or message.
High-Quality Source Material and Editing
Using high-resolution source material is crucial. Start with the best quality footage you can get your hands on; this will prevent any pixelation or loss of detail during resizing or compression. Good lighting is also paramount. Poor lighting can make your video look amateurish and hard to watch. Think about using natural light whenever possible, or investing in affordable lighting equipment for consistent results. Finally, invest time in editing. Even minor edits, like removing unnecessary footage or adding transitions, can greatly improve the viewer experience.
Captions and Hashtags
Captions are not just an afterthought; they’re a crucial element for accessibility and searchability. A compelling caption can significantly boost engagement by providing context, prompting interaction, and encouraging comments. Remember to keep it concise and engaging, and consider adding relevant emojis to enhance readability. Hashtags, on the other hand, act as s, making your video discoverable to a wider audience. Research relevant hashtags within your niche and incorporate a mix of popular and niche-specific ones. Avoid using too many hashtags, as it can look spammy. A good strategy is to find a balance between reach and relevance.
Engaging Content and Algorithm Alignment
Instagram’s algorithm prioritizes content that keeps users engaged. Videos that generate high levels of interaction – likes, comments, shares, and saves – are more likely to be shown to a wider audience. Create videos that are visually appealing, informative, entertaining, or emotionally resonant. Experiment with different video formats, such as Reels or Stories, to see what resonates best with your target audience. Consider incorporating interactive elements like polls, quizzes, or questions to encourage participation. The goal is to create content that people want to watch, share, and engage with.
Utilizing Instagram’s Built-in Editing Tools
Instagram offers a suite of built-in editing tools that can further enhance your videos after resizing. These tools allow for basic adjustments like brightness, contrast, saturation, and sharpness. You can also add music, text overlays, stickers, and GIFs to personalize your videos. Experiment with different filters and effects to find a style that aligns with your brand. Instagram’s built-in tools are user-friendly and provide a quick and easy way to add the finishing touches to your videos before posting. Remember, even small enhancements can make a big difference in the overall quality and appeal of your content.
Concluding Remarks
So there you have it – resizing videos for Instagram doesn’t have to be a headache. By following these steps and utilizing the tools we’ve highlighted, you can ensure your videos look their absolute best. Remember, it’s all about finding the right balance between ease of use, features, and the quality of your final product. Now go forth and create some seriously awesome Instagram content!