Sonatype Nexus Repository Manager: Forget juggling a million dependency files – this is your one-stop shop for managing everything from Maven artifacts to npm packages. Think of it as the ultimate organizational tool for your development team, streamlining workflows and boosting efficiency like a caffeine IV drip for your codebase. It’s not just about storage; it’s about control, security, and making your development life significantly less chaotic.
This powerful tool helps you manage all your project dependencies, ensuring consistency and security across your entire software development lifecycle. We’ll explore its core functionalities, different repository types, and the significant benefits it brings to the table, comparing it to other solutions along the way. Get ready to level up your DevOps game!
Introduction to Sonatype Nexus Repository Manager
Sonatype Nexus Repository Manager is your one-stop shop for managing all your software packages. Think of it as a highly organized, super-efficient warehouse for your code’s building blocks. It streamlines the process of storing, retrieving, and managing various types of software artifacts, making your development workflow smoother and more reliable. Essentially, it’s the ultimate tool for preventing dependency hell and ensuring consistent builds.
Nexus Repository Manager simplifies the complex world of dependency management. It acts as a central hub, providing a single point of access for developers to retrieve the components they need to build their applications. This eliminates the need for developers to hunt down dependencies from various sources, saving time and reducing the risk of using outdated or insecure components.
Core Functionalities of Sonatype Nexus Repository Manager
Nexus offers a comprehensive suite of features designed to optimize the software development lifecycle. Key functionalities include artifact storage and retrieval, proxy repositories for external sources like Maven Central, group repositories for aggregating multiple repositories into a single access point, and robust security features to control access to your valuable code components. It also provides features for managing repository health, including garbage collection and automated cleanup processes, maintaining the overall efficiency and security of your repository. Furthermore, it integrates seamlessly with various CI/CD pipelines, ensuring a smooth and automated build and deployment process.
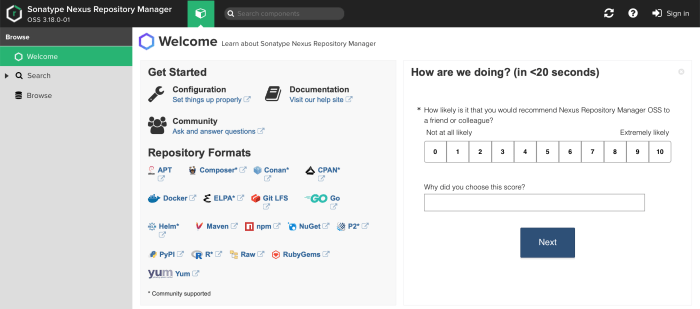
Supported Repository Types
Nexus supports a wide variety of package formats, catering to various programming languages and technologies. This ensures compatibility across different projects and teams. Key examples include Maven repositories for Java projects, npm repositories for JavaScript, NuGet repositories for .NET projects, and many more, encompassing a vast range of development ecosystems. This broad support eliminates the need for multiple, disparate repository management solutions.
Benefits of Using a Repository Manager Like Nexus
Implementing a repository manager like Nexus offers several significant advantages. Firstly, it improves developer productivity by providing a centralized and readily accessible source for all necessary components. This reduces the time developers spend searching for and resolving dependency issues. Secondly, it enhances security by allowing for fine-grained access control and the ability to scan for vulnerabilities within downloaded artifacts. Thirdly, it promotes code consistency and reduces build errors by ensuring that all developers are using the same versions of dependencies. Finally, it improves team collaboration by providing a shared repository for all project components. Using Nexus can significantly reduce the time spent on dependency management, allowing development teams to focus on building software instead of troubleshooting dependency issues.
Comparison with Other Similar Tools
While other repository managers exist, Nexus stands out due to its comprehensive feature set, robust security features, and extensive support for various package formats. Tools like JFrog Artifactory offer similar functionalities, but Nexus often boasts a more user-friendly interface and a larger community, leading to readily available support and resources. The choice between Nexus and alternatives depends on specific project needs and organizational preferences, but Nexus consistently ranks as a leading choice due to its versatility and ease of use. For example, while both Nexus and Artifactory offer proxy and hosted repositories, Nexus often simplifies the configuration and management of these repositories, making it a more approachable option for teams of varying technical expertise.
Setting up and Configuring Nexus Repository Manager
Source: cnblogs.com
Setting up Nexus Repository Manager, Sonatype’s powerful artifact repository, might seem daunting at first, but with a clear, step-by-step approach, it’s surprisingly straightforward. This guide will walk you through the installation on a Linux server, configuration of various repository types, user authentication, and authorization, providing you with a solid foundation for managing your project dependencies effectively.
Nexus Repository Manager Installation on Linux
Installing Nexus on a Linux server involves downloading the appropriate package, unpacking it, and running the startup script. First, download the latest Nexus Repository Manager OSS (Open Source) distribution from the Sonatype website. Ensure you select the Linux package compatible with your system’s architecture (e.g., `nexus-3.x.x-01-unix.tar.gz`). After downloading, extract the archive to your desired location (e.g., `/opt/sonatype-work/nexus3`). Navigate to the extracted directory and start Nexus using the provided startup script, typically named `nexus`. You might need to run it with `sudo` privileges. The startup script will usually launch Nexus in the background as a service. Verify its status and check the logs for any errors. You can usually access the Nexus web interface at `http://
Configuring Repository Types in Nexus
Nexus supports a variety of repository types, each serving a specific purpose. Understanding these types is crucial for effective artifact management. Common types include:
- Proxies: These repositories act as caches for remote repositories like Maven Central. They speed up build times by locally caching downloaded artifacts.
- Hosted: These repositories store artifacts deployed from your own projects. This is where you’ll deploy your team’s built libraries and applications.
- Groups: These repositories aggregate multiple other repositories (hosted, proxy, or other groups). This allows you to provide a single access point for your developers.
Configuring a new repository involves navigating to the “Repositories” tab in the Nexus web interface, selecting the desired repository type, and specifying relevant settings like repository ID, name, and remote URL (for proxies). Remember to carefully consider the appropriate repository type for each of your needs to ensure efficient artifact management.
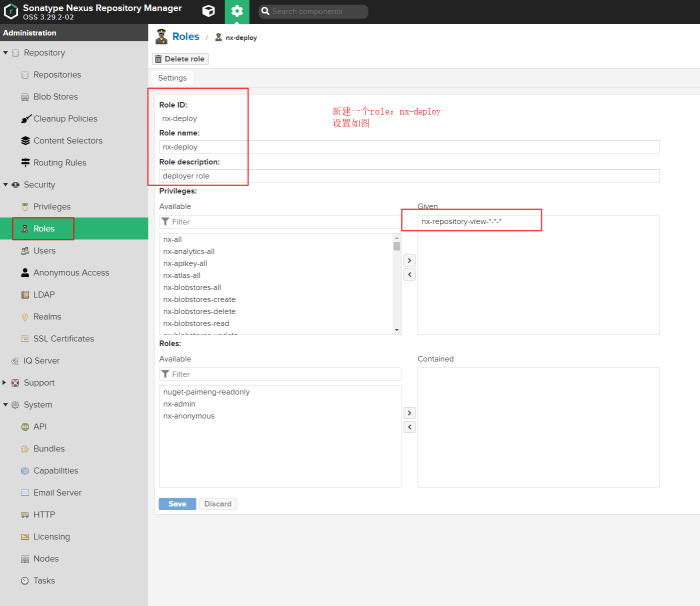
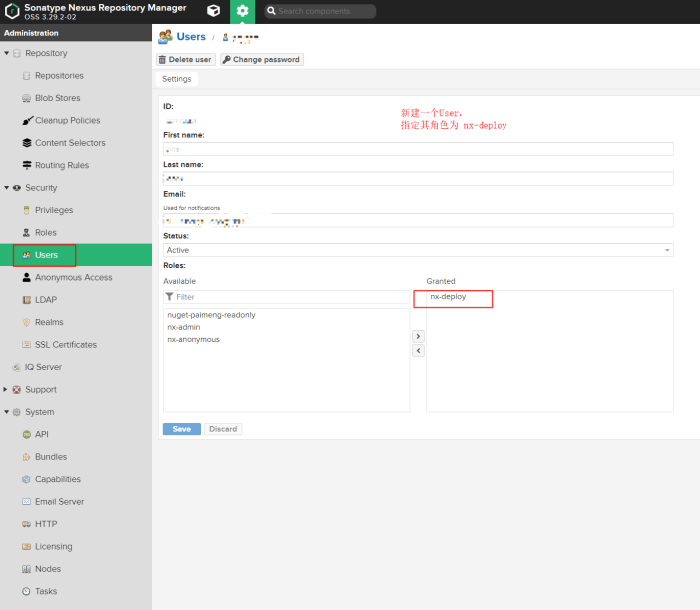
Setting up User Authentication and Authorization
Securing your Nexus repository is paramount. This is accomplished through user management and role-based access control (RBAC). Within the Nexus web interface, you can create users, assign roles (e.g., “deployer,” “developer”), and define permissions associated with those roles. For instance, you might grant “deployer” role access to deploy artifacts to hosted repositories, while “developer” role users have read-only access. This granular control allows you to carefully manage who can access and modify your valuable artifacts.
Common Nexus Configuration Options
The following table Artikels some frequently used Nexus configuration options:
| Option | Description | Default Value | Example |
|---|---|---|---|
nexus.work |
Directory where Nexus stores its data. | $nexus.install.dir/sonatype-work |
/opt/sonatype-work/nexus3 |
nexus.port |
Port number Nexus listens on. | 8081 |
8082 |
application-host |
Hostname or IP address Nexus is accessible at. | localhost |
your_server_ip |
nexus.tmp |
Directory for temporary files. | $nexus.install.dir/sonatype-work/nexus3/tmp |
/tmp/nexus |
Managing Repositories in Nexus Repository Manager: Sonatype Nexus Repository Manager
Source: cnblogs.com
Nexus Repository Manager isn’t just a place to store your project artifacts; it’s the central nervous system of your software development lifecycle. Effectively managing your repositories within Nexus is key to maintaining a smooth, efficient, and secure development process. This section dives into the practical aspects of repository management, from creation to access control.
Understanding how to create, populate, and secure your repositories is paramount for any team leveraging Nexus. This involves not only technical proficiency but also strategic planning for long-term scalability and maintainability. Let’s explore the key aspects.
Creating a New Maven Repository
Creating a new Maven repository in Nexus is straightforward. Navigate to the “Repositories” tab in the Nexus UI. You’ll see options to create various repository types, including Maven, npm, Docker, and more. For a Maven repository, select the appropriate type (hosted, proxy, or group) based on your needs. A hosted repository stores your own built artifacts, a proxy repository caches remote artifacts, and a group repository aggregates multiple other repositories into a single access point. You’ll then provide a name and other relevant configuration details, such as the storage location and any necessary authentication settings. Once configured, the repository is ready to receive artifacts.
Deploying Artifacts to a Nexus Repository
Deploying artifacts is typically done via the Maven command-line interface (CLI). The process involves configuring your `pom.xml` file to point to your Nexus repository’s URL and credentials. The standard Maven deploy command, `mvn deploy`, will then upload your built artifact to the specified repository. For example, the command might look something like this: mvn deploy -DaltDeploymentRepository=my-repo::default::https://nexus.example.com/repository/my-hosted-repo/. This command specifies the repository ID, the type (default for Maven), and the URL of the hosted repository. Successful deployment confirms the artifact is available for consumption by other projects. Remember to ensure your Nexus server is accessible and your credentials are correct.
Managing Repository Permissions and Access Control
Security is paramount. Nexus offers granular control over repository access. You can define roles and assign permissions to those roles, restricting access to specific repositories or artifact types. This allows for a layered security approach, ensuring only authorized users or teams can access sensitive information. For instance, you might create a role for developers with read and write access to a specific hosted repository, while other roles have read-only access or no access at all. This capability prevents unauthorized access and ensures compliance with security policies.
Organizing and Maintaining a Large Number of Repositories
As your organization grows, so will the number of repositories. Effective organization is crucial. A well-defined naming convention is the first step. Consider using a structure that reflects your project hierarchy or team structure. Grouping related repositories logically (using group repositories) simplifies access and management. Regular cleanup of old or unused artifacts is also essential to maintain performance and prevent storage bloat. Leverage Nexus’s built-in features for repository cleanup and garbage collection to automate this process. Regular audits of repository permissions and access control should also be part of your maintenance strategy. This ensures security policies remain current and relevant.
Utilizing Nexus Repository Manager for Security and Governance
Source: mtitek.com
Nexus Repository Manager isn’t just about storing your artifacts; it’s a crucial component in building a secure and well-governed software development lifecycle. By leveraging its robust security features and governance capabilities, organizations can significantly reduce risks and improve the overall quality of their software releases. This section dives into how Nexus helps you achieve this.
Nexus Repository Manager offers a powerful suite of security features designed to protect your valuable software components and ensure their integrity. These features extend beyond simple access control, encompassing vulnerability scanning, policy enforcement, and secure communication protocols. Properly configuring these features is paramount to mitigating risks associated with malicious code or compromised dependencies.
Nexus Repository Manager Security Features
Nexus offers a multi-layered approach to security. Access control, based on roles and permissions, restricts who can access specific repositories and perform certain actions. This granular control allows for fine-grained management of access rights, ensuring only authorized personnel can interact with sensitive artifacts. Furthermore, Nexus supports various authentication mechanisms, including LDAP and Active Directory integration, streamlining user management and aligning with existing organizational security infrastructures. Secure communication protocols, like HTTPS, protect data transmitted to and from the repository. Finally, features like audit logging provide a detailed record of all repository activities, facilitating security investigations and compliance auditing.
Enforcing Software Component Governance with Nexus
Nexus Repository Manager plays a pivotal role in enforcing software component governance by providing a central point of control for managing and monitoring artifacts. This includes enforcing policies regarding artifact versions, lifecycle stages, and access restrictions. For instance, Nexus can be configured to prevent the deployment of outdated or vulnerable components, ensuring that only approved versions are used in production environments. The ability to create and manage custom repository types allows for tailored governance strategies based on specific project needs and compliance requirements. Regular vulnerability scanning and automated remediation workflows, integrated with Nexus, further strengthen the governance posture.
Integrating Nexus with Other Security Tools
Nexus seamlessly integrates with various security tools to enhance its capabilities. This integration often involves plugins or APIs that allow for automated vulnerability scanning, policy enforcement, and reporting. For example, integrating Nexus with a vulnerability database like the National Vulnerability Database (NVD) allows for automated identification of known vulnerabilities in your dependencies. Integration with security information and event management (SIEM) systems enables centralized monitoring and alerting on security-related events within the Nexus repository. This collaborative approach creates a comprehensive security ecosystem.
Managing Vulnerabilities Discovered Within Deployed Artifacts
A robust workflow is essential for effectively managing vulnerabilities discovered in deployed artifacts. This workflow typically begins with automated vulnerability scanning within Nexus, triggering alerts when known vulnerabilities are identified. The identified vulnerabilities are then reviewed and prioritized based on their severity and potential impact. A remediation plan is then developed, which may involve updating the affected components to newer, patched versions, or implementing mitigating controls. Nexus facilitates this process by providing tools for managing artifact versions and promoting approved updates through the release pipeline. Throughout this process, thorough documentation and audit trails are maintained to ensure transparency and compliance.
Advanced Features and Integrations
Nexus Repository Manager isn’t just about storing artifacts; it’s about managing your entire software supply chain. This section dives into the powerful advanced features and integrations that elevate Nexus from a simple repository to a crucial component of a robust DevOps strategy. We’ll explore how to leverage its capabilities for enhanced security, automation, and streamlined workflows.
Nexus Lifecycle and Software Bill of Materials (SBOMs)
Nexus Lifecycle provides a comprehensive solution for managing software bill of materials (SBOMs). SBOMs are crucial for understanding the components within your software, enabling efficient vulnerability management and compliance efforts. Lifecycle integrates seamlessly with Nexus Repository Manager, allowing you to automatically generate and manage SBOMs for your projects. This facilitates tracking of components, identifying potential vulnerabilities early in the development lifecycle, and ensuring compliance with industry regulations. For instance, you can automatically generate SPDX or CycloneDX SBOMs for your projects, providing a detailed inventory of all included libraries and dependencies. This granular level of visibility empowers teams to make informed decisions about security and risk mitigation.
Integrating Nexus with CI/CD Pipelines, Sonatype nexus repository manager
Seamless integration with your CI/CD pipeline is essential for efficient software delivery. Nexus Repository Manager offers various methods for integration, including REST APIs, plugins for popular CI/CD tools like Jenkins and GitLab CI, and dedicated CLI tools. These integrations automate the deployment and management of artifacts throughout the pipeline, ensuring consistency and reducing manual intervention. For example, you can configure your CI/CD pipeline to automatically publish artifacts to Nexus upon successful build completion, and then deploy these artifacts to staging or production environments. This automation minimizes the risk of human error and accelerates the release cycle.
Nexus IQ Server for Vulnerability Scanning
Nexus IQ Server is a powerful vulnerability scanning tool that integrates directly with Nexus Repository Manager. It analyzes your project dependencies, identifying known vulnerabilities and providing remediation guidance. This proactive approach helps prevent security breaches and ensures the security of your applications. IQ Server uses a comprehensive database of known vulnerabilities, constantly updated to provide the most current information. It provides detailed reports, including severity levels and suggested fixes, helping developers prioritize remediation efforts effectively. Imagine a scenario where IQ Server detects a critical vulnerability in a widely used library. It would immediately alert the development team, enabling them to promptly address the issue before it’s exploited.
Utilizing Nexus APIs for Automation
Nexus Repository Manager exposes a rich set of REST APIs, enabling extensive automation capabilities. These APIs allow you to programmatically manage repositories, users, permissions, and other aspects of the system. This automation can be used to create custom workflows, integrate with other tools, and streamline various administrative tasks. For example, you can write a script that automatically creates new repositories based on predefined templates, or one that generates reports on repository usage. This level of automation significantly increases efficiency and reduces the need for manual intervention. A practical example is using the API to create a new repository for a specific project, automatically configure access permissions, and then deploy artifacts from the CI/CD pipeline.
Troubleshooting and Best Practices
Nexus Repository Manager, while powerful, can sometimes present challenges. Understanding common issues and implementing best practices are crucial for smooth operation and optimal performance. This section covers practical troubleshooting steps and strategies for maximizing Nexus’s efficiency and scalability.
Effective troubleshooting hinges on proactive monitoring and a systematic approach to problem-solving. By understanding potential bottlenecks and implementing preventative measures, you can minimize downtime and ensure the reliable delivery of artifacts.
Common Nexus Issues and Resolutions
Several common problems can arise when using Nexus. These range from simple configuration errors to more complex performance bottlenecks. Addressing these effectively requires a combination of diagnostic tools and a clear understanding of Nexus’s architecture.
For example, slow repository access might indicate insufficient disk I/O, while frequent connection timeouts could point to network configuration issues. Similarly, unexpected errors during deployments often stem from misconfigured security settings or incorrect artifact metadata.
| Issue | Solution |
|---|---|
| Slow Repository Access | Check disk space, increase Nexus JVM heap size, optimize database queries (if applicable), investigate network bandwidth limitations. |
| Connection Timeouts | Verify network connectivity between clients and Nexus, check firewall rules, ensure DNS resolution is correct. |
| Deployment Errors | Review deployment scripts for errors, verify artifact metadata, check Nexus logs for detailed error messages, ensure sufficient disk space and permissions. |
| High CPU/Memory Usage | Monitor Nexus resource utilization, tune JVM settings, optimize garbage collection, upgrade hardware if necessary. |
Optimizing Nexus Performance and Scalability
Maintaining optimal Nexus performance requires a multi-faceted approach. This involves proactively monitoring resource usage, optimizing configuration settings, and potentially scaling your infrastructure to accommodate growing demands.
Regular monitoring allows for early detection of performance bottlenecks. This proactive approach prevents minor issues from escalating into major problems. Key metrics to track include CPU utilization, memory usage, disk I/O, and network throughput.
- Regularly monitor resource usage: Use built-in Nexus monitoring tools or external monitoring systems to track CPU, memory, and disk I/O.
- Optimize JVM settings: Adjust heap size, garbage collection settings, and other JVM parameters to optimize performance based on your specific workload.
- Utilize caching effectively: Configure appropriate caching strategies to reduce load on upstream repositories.
- Consider horizontal scaling: For very large deployments, consider using multiple Nexus instances to distribute the load.
Troubleshooting Deployment Errors
Deployment failures can be frustrating, but a methodical approach can help pinpoint the root cause. Analyzing error messages, verifying configuration settings, and examining Nexus logs are essential steps.
A systematic approach involves checking the deployment script for errors, verifying artifact metadata, ensuring sufficient disk space and permissions, and carefully examining Nexus logs for detailed error messages. These steps will help quickly isolate and resolve the problem.
- Examine Deployment Scripts: Carefully review the deployment script for syntax errors, incorrect paths, or other issues.
- Verify Artifact Metadata: Ensure that the artifact’s metadata (e.g., group ID, artifact ID, version) is correct and consistent.
- Check Nexus Logs: Analyze Nexus logs for detailed error messages and stack traces. These often provide valuable clues about the cause of the failure.
- Verify Disk Space and Permissions: Ensure that Nexus has sufficient disk space and appropriate file permissions.
Analyzing Nexus Logs for Problem Identification
Nexus logs provide a wealth of information for troubleshooting. Understanding the log structure and effectively searching for relevant entries are key skills for any Nexus administrator.
Nexus logs are typically stored in a dedicated log directory. These logs contain detailed information about all Nexus activities, including successful and failed operations. Analyzing these logs allows for pinpointing the root cause of many issues. Effective log analysis requires familiarity with log levels (DEBUG, INFO, WARN, ERROR) and the ability to use search tools to filter relevant entries.
Effective log analysis is crucial for proactive problem solving and performance optimization.
Illustrative Scenarios
Nexus Repository Manager isn’t just a storage space; it’s a powerful tool for managing and securing your project’s dependencies. Let’s look at how it can proactively protect your applications and streamline your development workflow. These scenarios highlight Nexus’s capabilities in action.
Preventing Vulnerable Dependency Deployment
Imagine a scenario where your development team is using a popular open-source library, ‘AwesomeLib’, in their latest project. During the build process, Nexus Repository Manager scans ‘AwesomeLib’ against its integrated vulnerability database (like those provided by Sonatype’s Lifecycle). The scan reveals a critical vulnerability (CVE-2024-XXXX) that could allow remote code execution. Nexus, configured to block deployments with known vulnerabilities, immediately flags the issue. The build process is halted, and a notification is sent to the development team. This prevents the vulnerable library from being deployed to the production environment, avoiding a potential security breach. The team can then investigate alternative libraries, patch ‘AwesomeLib’, or implement mitigating controls before proceeding with the deployment. The impact of using Nexus is clear: a significant reduction in the risk of a production security incident and potentially substantial cost savings associated with remediation efforts.
Managing Internal and External Dependencies
A company uses Nexus to manage both internal and external libraries. They configure several repositories: a proxy repository for Maven Central (an external repository), a hosted repository for their internally developed libraries, and a group repository that combines both. Access control is implemented using roles and permissions. Developers have read access to all repositories, allowing them to download dependencies. Release engineers have write access to the hosted repository, enabling them to upload approved internal libraries. Security teams have read-only access to all repositories for auditing purposes. This setup ensures that internal libraries are properly versioned and controlled, while external dependencies are efficiently cached and scanned for vulnerabilities. The group repository simplifies dependency management for developers, providing a single point of access to all necessary libraries. This efficient and secure system prevents accidental use of outdated or insecure libraries and maintains consistency across projects. The clear separation of internal and external dependencies, combined with granular access control, provides a robust and secure dependency management solution.
Final Summary
From streamlining your CI/CD pipeline to bolstering your security posture, Sonatype Nexus Repository Manager is more than just a repository; it’s a strategic asset for any serious development team. By mastering its features, you’re not just managing code; you’re optimizing your entire development process, releasing better software faster, and sleeping soundly knowing your dependencies are secure. So ditch the dependency headaches and embrace the Nexus revolution – your future self will thank you.